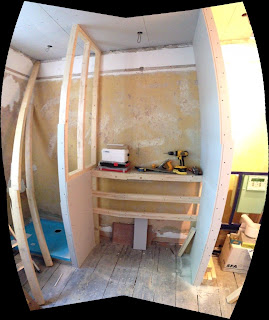
The main job I was keen to have completed this weekend was to get the plasterboard up on the bedroom side of the new wall. So after a late Saturday start and another trip down to Travis Perkins for some more plasterboard, I set about doing just that. Before I was happy to cover up the cavity which would serve to accommodate my two sliding doors I did want to check that the door stop-outs were correctly positioned. However, poor organisation on my part the previous week meant that I had not ordered them in time for delivery. In the end I settled for cutting a piece of 2x3 to the width of one of the doors and screwing all of the relevant fixtures and fittings onto it, then sliding it into the rails to check that the stop-out location was suitable. It can still be seen in place in some of the pictures.
The stop out was fine and I began to put up the plasterboard but I was tired and it was at this point that I made the cardinal sin of forgetting to take step by step photos. I think I saved it with this though - There is a piece in the top left which I had not done yet....
Aaaand, now its done... You may also notice from these pictures that I have fitted a light switch to the right of the doorway. This is for the lights in the bathroom, which as you know I placed the wiring for the weekend that my Dad was up. I could not resist wiring a couple of them up just to check the system. They are not fitted flush yet and wont be until I have had the ceiling skimmed with plaster. I am also going to hold off on wiring in the others until I have had this done, as I don't want them getting in the plasterers way.
With some time left I moved on to the central dividing walls that will serve to support the sink and enclose the shower and toilet. Before I continued work on these stud walls I could not resist putting the sink into position to get an idea of what its going to look like. I think I justified it to myself by claiming that I needed to make sure it fit but that was rubbish, I had measured it already.
So with that checking complete I just needed to add some rigidity to the stud work to support the vanity unit and then start plaster boarding the side walls. All much of the same again really...
The timber behind the vanity is to step out the vanity and sink so that it sits flush with the walls. It also gives a cavity space for the SaniShower and the other pipes needed for the water supply to the shower and sink. The SaniShower is the pump for taking waste water back to the flats existing plumbing.
I stopped at this point, partly because the weekend was over, partly because I want to cover the back panel in MDF instead of plasterboard (which I did not have), but mostly because I am waiting for the shower mixers and fittings and I don't want to cover the rest of the wall until I know where I am going to need access. All of that was ordered at the beginning of this week and will hopefully be ready for collection on Saturday morning along with the toilet which I have been told is already ready for collection.
That's the lot for last weekend, as I say, not very much done really but small progress is still progress. Nobody to thank this weekend, so I will give myself a pat on the back and thank you all for reading or looking at the piccies, whatever you do. Thanks!


No comments:
Post a Comment