Thursday, 18 July 2013

So this is what I've been up to during the sunshine...

So in this post I have to cover two weekends worth of work, however don't get too excited, this hot weather is killing my productivity. The first weekend I had two visitors, hot weather and Wimbledon finals. A wicked combination that meant all that was done was the hanging of the sliding double doors to the bathroom.

To do this I first needed to route a slot in the bottom edge of the door to allow for an alignment pin. A colleague (Jon) very kindly lent me a router as mine is still in London, and on Saturday afternoon I set to work.


With slot cut I simply insert a length of extruded aluminium profile, supplied with the doors. Cut off the excess off, and silicone it in.


Then I fitted the runners to the top and the soft close actuators and fitted it into place. After a little adjustment they lined up nicely.


And with that, slightly disappointingly, that was all of the work that I did that weekend. It was nice to see AJ and my mum who both came up to visit (independently). Many thanks to Jon for the router loan, that saved me an awful lot of bother, heading back to London, or buying a new one.

So this weekend just gone came around fairly quickly and I was eager to make up on the previous ones poor  effort. In the week I had bought the door furniture, once again from Ironmongerydirect.com and they came very promptly. After routing all the appropriate holes for the parts and doing a quick test fitting, I removed them again and set about painting the doors in a white gloss.


Painting begins...


And its this point that I realize that I did not take a fully painted photo of the doors, so, like a poorly written american drama, you will just have to live with suspense of not knowing how they turned out until I next photograph that area of the room...

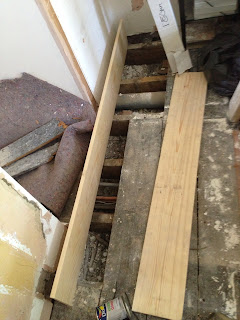
With that job done (you will have to take my word that I did get further than the above picture suggests) I turned my attention to the other side of the room, and replacing the damaged floorboards that were removed many weeks back.


The reason I wanted to get this done was so that I would be able to complete the remaining stud work that has to go in to hide the pipework.


So satisfied that job done I set about adding the new stud work. I popped down to see our friend at Travis Perkins and although I payed for standard lengths of 2x3 when I got to the yard they were out. No worries though our nameless hero just loaded us up with treated wood instead.

While prepping the wall I started pealing back some more of the woodchip wallpaper and soon enough one thing had led to another and that full corridor wall was almost stripped bare. A bit of a digression from planned work but it all needs to get done at some point and it was super satisfying.


So with the wall prepped the new stud work began to go in.


At this point I realized I was going to have to bite the bullet, and say goodbye to old bathroom privacy as I needed to smash a hole through the wall for the new waste pipes. A job which felt like surgical demolition, as I had already started putting up the new stud work when I realized that I was going to have to pull down the old.

Anyhow, with that job completed and a great big pile of rubbish on the floor. I finished up the rest of the supporting pieces and cleared up.


But wait! That's not all that got done that weekend. I was on a mission to make up from the previous weekends poor effort. So next I moved onto the Saniwall Saniflo unit in the bathroom. This is what the toilet will attach to and what will pump the waste water around to the existing plumbing. It is a suspended toilet and its therefore imperative that this unit is secured well enough to support a considerable weight.


After a huge amount of drilling and ratcheting in bolts and all sorts, as well as a bit of plumbing prep on the pump unit itself, it went in.


Finally, and with a pretty poor piece of photography to show it, I added in the beginnings of the stud work that will support the covering wall, and potentially make up the frame for a cupboard above the toilet itself. A feature that may be scrapped but I keep being reminded about the importance of storage from a certain someone...

That was all for that weekend. The next job is to get on that plumbing and fit the shower tray properly before adding in the last plasterboard in the shower room before getting a plasterer in. That's all still to come. Thanks to Jon once again for the router and thanks to you for checking in on progress after the two week hiatus!

Thursday, 4 July 2013

A small update...

Well last weekend came and went without much of the usual drama or memorable building antics. No building helpers or interesting visits supply depo's. That said, some progress was made and I could not leave the this with a page with gaps in it. I'm sure I would be inundated with inordinate quantities of venomous messages and hate mail, and a phone ringing off the hook with disgruntled readers demanding that I justify when it was that I put up that piece of plasterboard or wired that light... Hmm, perhaps not, but like an open book, its here none the less.


The main job I was keen to have completed this weekend was to get the plasterboard up on the bedroom side of the new wall. So after a late Saturday start and another trip down to Travis Perkins for some more plasterboard, I set about doing just that. Before I was happy to cover up the cavity which would serve to accommodate my two sliding doors I did want to check that the door stop-outs were correctly positioned. However, poor organisation on my part the previous week meant that I had not ordered them in time for delivery. In the end I settled for cutting a piece of 2x3 to the width of one of the doors and screwing all of the relevant fixtures and fittings onto it, then sliding it into the rails to check that the stop-out location was suitable. It can still be seen in place in some of the pictures.


The stop out was fine and I began to put up the plasterboard but I was tired and it was at this point that I made the cardinal sin of forgetting to take step by step photos. I think I saved it with this though - There is a piece in the top left which I had not done yet....


Aaaand, now its done...  You may also notice from these pictures that I have fitted a light switch to the right of the doorway. This is for the lights in the bathroom, which as you know I placed the wiring for the weekend that my Dad was up. I could not resist wiring a couple of them up just to check the system. They are not fitted flush yet and wont be until I have had the ceiling skimmed with plaster. I am also going to hold off on wiring in the others until I have had this done, as I don't want them getting in the plasterers way.


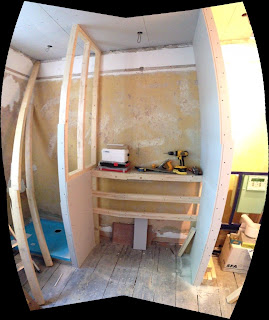
With some time left I moved on to the central dividing walls that will serve to support the sink and enclose the shower and toilet. Before I continued work on these stud walls I could not resist putting the sink into position to get an idea of what its going to look like. I think I justified it to myself by claiming that I needed to make sure it fit but that was rubbish, I had measured it already.


So with that checking complete I just needed to add some rigidity to the stud work to support the vanity unit and then start plaster boarding the side walls. All much of the same again really...


The timber behind the vanity is to step out the vanity and sink so that it sits flush with the walls. It also gives a cavity space for the SaniShower and the other pipes needed for the water supply to the shower and sink. The SaniShower is the pump for taking waste water back to the flats existing plumbing.

I stopped at this point, partly because the weekend was over, partly because I want to cover the back panel in MDF instead of plasterboard (which I did not have), but mostly because I am waiting for the shower mixers and fittings and I don't want to cover the rest of the wall until I know where I am going to need access. All of that was ordered at the beginning of this week and will hopefully be ready for collection on Saturday morning along with the toilet which I have been told is already ready for collection.

That's the lot for last weekend, as I say, not very much done really but small progress is still progress. Nobody to thank this weekend, so I will give myself a pat on the back and thank you all for reading or looking at the piccies, whatever you do. Thanks!